Pages

Wednesday, April 6, 2011

Grandmother's Flower Garden Quilt as you go

While I was in Alabama over the winter, one of the ladies in the RV park showed us her Grandmother's Flower Garden quilt.  It was wonderful!  She explained that the pattern had been published back in the 70's in Better Homes and Gardens magazine. She showed us how it was made which is really relatively easy.  So I've started making a GFG quilt for myself, and as I've gone through the basic steps I've taken pictures.  I'm going to attempt to write this as a tutorial for anyone else who would like to make one.


The original instructions directed us to make cardboard templates for hexagons with 2" sides, but I purchased a set of hexagon rulers developed by Marti Mitchell.  They are the Quilt Sense Cut Shapes Hexagons.
The package came with 3 sizes of hexagons - 1", 2", and 3".  I'm using the 2" for my GFG quilt.


I cut 4" strips from my fabrics and 3.75" strips from my batting. I cut the batting a slight bit smaller than the fabric, so that there would be a bit less bulk in the seams.

Next I put the fabric strips right sides together so that I could cut out both the front and the back hexagon pieces at the same time.


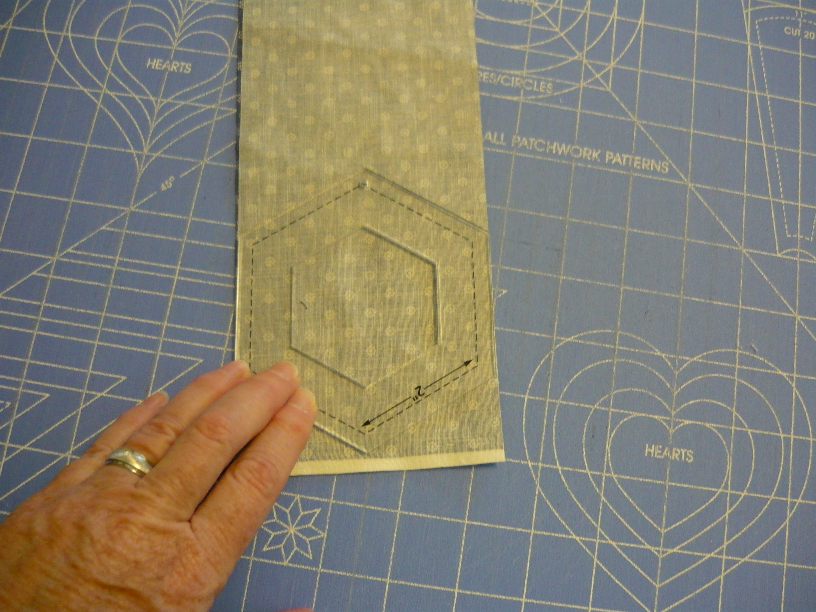
Then I placed the hexagon ruler on the strip, making sure the flat side edges of the ruler lined up with the edges of the fabric.  Then using a rotary cutter I cut out the hexagons. I followed the same procedure to cut out the batting hexagons.  Using this ruler and strip method creates a bit more waste of fabric than some other methods, but I found it to be more accurate and quicker this way.


When the above step is finished, you will have 2 fabric hexagons and 1 batting hexagon. As shown to the right.


Now layer the 3 pieces.  Put the 2 fabric pieces with right sides together and place the batting piece on top.

Using the quarter inch foot on your sewing machine sew around 5 sides of the hexagon.  You want to leave the sixth side open so that the hexagon can be turned right side out. Before turning, trim off the corners to about 1/8" from the stitching of the sandwiched piece. This helps to alleviate some of the bulk in the corners. Now turn the piece right side out.
After turning the hexagon right side out, you need to use a pointed object to push the corners out from the inside.  I used a chopstick that I sanded to a point on one end.  This works really well to get the corners nice and sharp.


Now you begin the hand sewing.  Fold in a quarter inch of the front and the back of the open side and using small stitches, whip stitch the side together.  Next work 2 lines of small running quilt stitches about a quarter inch from the outside edge and then another quarter inch inside that line of stitches, so that you have 2 rows of hexagons quilted in the individual petal.  The picture on the right is my first hexagon, you can see that it is not perfectly hexagonal, but I have gotten better as I've made more petals. (Actually, I think the picture is slightly distorted.  Look at the "straight" line below the petal.)

To assemble one complete flower block, sew a round of 6 individual hexagon petals to the center hexagon. Use small overcast stitches at the hexagons' edges.  Turn the piece over and sew overcast stitches along the edges of the other side, too. Since this will be a 2 sided quilt, you want the stitching on both sides to be nice.


Attach the third round of 12 individual hexagon petals to this sewn piece, adding the hexagons one at a time.  This completes 1 of the quilt's flower blocks.


I'm using unbleached muslin hexagons to join the completed flower blocks together by stitching 1 row of muslin hexagons between each flower block.  My finished queen sized quilt will have about 39 flowers.

Friday, February 11, 2011

Coastal Haven Sew 'n Sews

The ladies at the Coastal Haven RV park have formed a guild! 
We have had such fun sewing together for the past month that we thought it was time to become an official guild.  We are truly a national guild since we have members from throughout the U.S. Some of us have real brick and mortar homes that we go back to after the winter ice and snows are gone and the weather warms.  Others live full time in their RV's and live wherever the weather blows them. Most of us have come back to Coastal Haven for several winters and plan to return next year. Therefore, our guild will remain viable, and the membership will increase as other RVer's join in our fun.

We've been sewing regularly on Tuesdays and Thursdays.  Most of us made purses under the direction of Joan and Rosanne who are our resident "purse-making" experts.  This project, of course, required a couple of road trips to quilt shops in Gulf Shores (or was it Orange Beach?) and Magnolia Springs, Alabama. Fabric shopping expeditions always include lunch. We have to keep up our strength, you know.
Our second shopping trip resulted in talking with Mary the owner of the Magnolia Springs Fabric store.  Mary offered to come to Coastal Haven to teach a class.  She listed several techniques that she could teach, and we chose to have her present a class on foolproof binding.  On February 10th twelve of our members assembled with our sewing machines in the clubhouse for Mary's binding class.  Her class was very clear and concise with easy to follow directions.  Everyone was able to master her smooth binding technique as we attached binding to place mats. 
 Naturally, those of us who were working on our binding didn't have time to prepare our own lunch.  Linda and Chris did that for us!  They prepared 2 delicious homemade soups, garlic bread, and brownies.  A few ladies brought salads and desserts to add to the menu.  Needless to say, we were well-fed!

In addition to our sewing sessions, we attended the Quilt Show in Robertsdale, AL at the Methodist church on Feb.3.  This was a fabulous show that featured about 300 quilts.  All types of quilts were on display - antique, patchwork, applique, stack and whack, etc.  We worked up quite an appetite while looking at the quilts, so naturally, we went to lunch together and had a lot of fun.
As I begin to reflect on the activities of our guild, I see that we eat almost as much as we sew.  Maybe we should change our name to the Sew 'n Eats!


Well, it's time for me to get back to my sewing.

Thursday, February 3, 2011

Log Cabin quilt

I have been working on a log cabin quilt with 3" squares. I save the smallest of scraps to use in this quilt.  When I buy shirts to use for my quilting, I use the button plackets and the collar bands in my log cabins. I only work on this quilt when we are spending extended time in our 5th wheel RV.  I bring my 1935 Singer Featherweight sewing machine with me and a container of light scraps and a container of dark scraps. Then I am ready to sew!

So far I have 256 blocks sewn together. I love looking at all the different fabrics. Many of them are pieces from many years ago when I sewed clothing for myself and shirts for my husband and boys. It's like walking down memory lane when I recognized pieces from various projects from the past.

Wednesday, January 5, 2011

Bonnie Hunter Mystery Blocks

I've been working for the last month on Bonnie Hunter's new Mystery Quilt.  Last Friday she gave the clue that put the many pieces together into 2 blocks. One is a variation of the Prickley Pear block, and the other is a string block. I only had time to assemble 3 of each block - just enough to give me a good idea of how my quilt will look.  I love it! The contrast between blocks is very good.  When the quilt is finished, these blocks will be set on point with 1/2 string blocks being used for the side setting triangles. Bonnie still has another clue to release on Friday which will show the borders for the finished quilt.  We have pieces cut and sewn that will be used in this border. The picture below is Bonnie's quilt top.

We left home on Sunday for our winter destination - Fairhope, Alabama.  We will live here for the next couple of months in our RV, so I won't be able to finish this quilt until I return home in mid-March.  That's OK though, since I know how the quilt will look when it's finished.