While I was in Alabama over the winter, one of the ladies in the RV park showed us her Grandmother's Flower Garden quilt. It was wonderful! She explained that the pattern had been published back in the 70's in Better Homes and Gardens magazine. She showed us how it was made which is really relatively easy. So I've started making a GFG quilt for myself, and as I've gone through the basic steps I've taken pictures. I'm going to attempt to write this as a tutorial for anyone else who would like to make one.

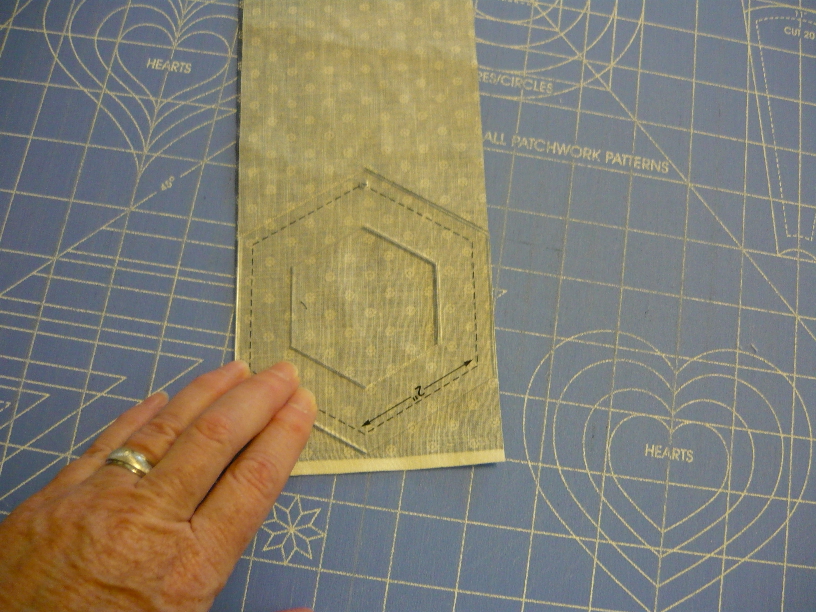
The original instructions directed us to make cardboard templates for hexagons with 2" sides, but I purchased a set of hexagon rulers developed by Marti Mitchell. They are the Quilt Sense Cut Shapes Hexagons.
The package came with 3 sizes of hexagons - 1", 2", and 3". I'm using the 2" for my GFG quilt.
I cut 4" strips from my fabrics and 3.75" strips from my batting. I cut the batting a slight bit smaller than the fabric, so that there would be a bit less bulk in the seams.
Next I put the fabric strips right sides together so that I could cut out both the front and the back hexagon pieces at the same time.

Then I placed the hexagon ruler on the strip, making sure the flat side edges of the ruler lined up with the edges of the fabric. Then using a rotary cutter I cut out the hexagons. I followed the same procedure to cut out the batting hexagons. Using this ruler and strip method creates a bit more waste of fabric than some other methods, but I found it to be more accurate and quicker this way.
When the above step is finished, you will have 2 fabric hexagons and 1 batting hexagon. As shown to the right.
Now layer the 3 pieces. Put the 2 fabric pieces with right sides together and place the batting piece on top.
Using the quarter inch foot on your sewing machine sew around 5 sides of the hexagon. You want to leave the sixth side open so that the hexagon can be turned right side out. Before turning, trim off the corners to about 1/8" from the stitching of the sandwiched piece. This helps to alleviate some of the bulk in the corners. Now turn the piece right side out.
After turning the hexagon right side out, you need to use a pointed object to push the corners out from the inside. I used a chopstick that I sanded to a point on one end. This works really well to get the corners nice and sharp.
Now you begin the hand sewing. Fold in a quarter inch of the front and the back of the open side and using small stitches, whip stitch the side together. Next work 2 lines of small running quilt stitches about a quarter inch from the outside edge and then another quarter inch inside that line of stitches, so that you have 2 rows of hexagons quilted in the individual petal. The picture on the right is my first hexagon, you can see that it is not perfectly hexagonal, but I have gotten better as I've made more petals. (Actually, I think the picture is slightly distorted. Look at the "straight" line below the petal.)

To assemble one complete flower block, sew a round of 6 individual hexagon petals to the center hexagon. Use small overcast stitches at the hexagons' edges. Turn the piece over and sew overcast stitches along the edges of the other side, too. Since this will be a 2 sided quilt, you want the stitching on both sides to be nice.
Attach the third round of 12 individual hexagon petals to this sewn piece, adding the hexagons one at a time. This completes 1 of the quilt's flower blocks.
I'm using unbleached muslin hexagons to join the completed flower blocks together by stitching 1 row of muslin hexagons between each flower block. My finished queen sized quilt will have about 39 flowers.


 To assemble one complete flower block, sew a round of 6 individual hexagon petals to the center hexagon. Use small overcast stitches at the hexagons' edges. Turn the piece over and sew overcast stitches along the edges of the other side, too. Since this will be a 2 sided quilt, you want the stitching on both sides to be nice.
9 comments:
Linda, I LOVE your method of piecing this quilt! I am a disabled homemaker with fibromyalgia and would love to make something like this but there is no way I could spend hours at a machine! I think I could actually do this in bed if I had to. Thanks so much for sharing! Oh, do you prewash the fabric and batting? Thanks!
Wow! I have never seen anything like this before...that is really cool!! I've always pieced hexagons the old-fashioned way (by hand, with a quarter inch seam). I giggle at the English paper piecing method, which is really popular right now, but seems really labor intensive. YOUR method probably takes a little time (until you gain speed), but then it is done! Backed, quilted, everything! VERY COOL!!! I hope this catches on out there in Blogland...
In stitches,
Teresa :o)
This sounds like something I'd like to try. Thanks for sharing!
What an excellent method!! GFG has been on my bucket list forever, but the concept of doing one all by hand has kept it in the "someday" list. This feels totally doable. AND I adore the idea of doing one side in civil war repros & the other side in brights, & having two totally different quilts at once! Thank you!!
I like your tutorial. I saw a woman doing something similar at a guild meeting. She had one fabric hexagon and one batting hexagon which were the same size. Then she had a second fabric hexagon (in a contrasting color) which was larger than the first fabric hexagon. She layered them with the wrong sides of the fabric facing the batting which was the middle layer.
She folded the edge of the larger fabric hexagon over the edge of the other two layers to make a little hem and then whip stitched or blind stitched it down. She did that all the way around the hexagon.
Then she quilted the hexagons and whipstitched them together as you did. She was doing this as a one patch quilt rather than a GFG, so her hexagons were medium large (to show off her fabrics) and they looked so pretty with their contrasting borders.
I found myself wondering if it might not be possible to sew the hexagons together by butting them up against each other and then joining them by machine with a decorative stitch, but I have never tried it.
I am so glad to see your information on Grandmothers Flower Garden Quilt as you go. After my mom passed away I found the pieces to a quilt she was making, but their was no pattern. I have been searching the internet, quilt stores, friends, without any luck. But here it is...this is exactly what I have. 32 two sided flowers. She started making the muslin hexagons to connect the flowers, but only got 3 done. I am afraid I do not quilt, or sew, so I am going to connect the flowers without the muslin surrounding the flowers. Or it may never get finished. But I am so glad to see this pattern, she started it in the late 70's so I am sure she got it out of the magazine your referenced. Thanks, Julie
Your method is outstanding! I absolutely love it!
I was wondering if, instead of quilting one set of hexies at a time ... one could create a complete flower, quilt it and attach as you have indicated?
Thanx for sharing!
How funny. I actually have that issue of Better Homes and Garden magazine. I believe it was from 1978. If anyone would like a copy of the instructions please let me know. I’ll only charge you for postage and for coping it which shouldn’t be much. And now that my children are grown with children of their own I’m going to finally make this quilt. I’m using reproduction fabric. I’m really excited about it.
My mother made this exact quilt in the 70s, and I still have it. I only became a quilter after she passed away in 1987. It was fascinating to watch her make the hexagons, and she did every stitch by hand--she loved that it was a project that she could take with her anywhere she went.
Recently I've decided to make this quilt, using bee and hive themed fabric, and over the weekend I found the file with the pattern she used, the pages she cut out of the BH&G magazine so long ago. It's going to be a lovely adventure into the past.
Post a Comment