Pages

Sunday, November 4, 2012

Fairhope Log Cabin Quilt

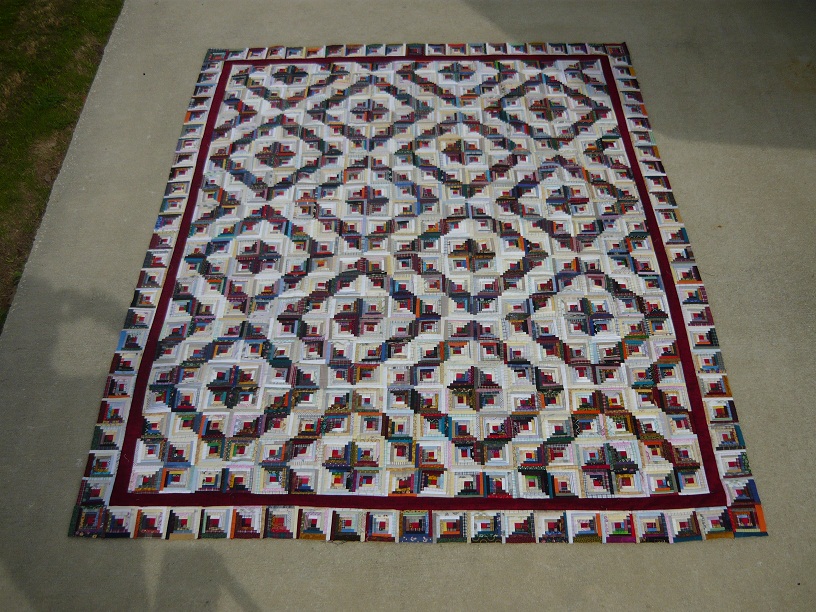
I have finally completed my log cabin quilt made from 3" blocks.  I started this quilt 3 years ago.  It was a perfect take-along project to be made when we were traveling in our 5th wheel trailer. I always take my 1936 Singer Featherweight sewing machine with me in the trailer.  It is small enough to sit on one corner of the dining table in the trailer without getting in the way.  I only needed to take two medium-sized bins of scraps - one bin of light scraps and one bin of dark.

This project began in December of 2009. I was in no great hurry to finish, and I had no idea of what size it would be when I started.  I simply enjoyed making the little blocks.  Many of my winter friends at Coastal Haven RV Park in Fairhope gave me small scraps that were leftover from their sewing projects.  The pieces in this quilt are so small that most people threw that size scrap away. The blocks finish at 3" and have 17 logs per block, so the logs were only about 1/4" wide.
I finished piecing the quilt last winter and added a red inner border surrounded by an outer border of log cabins.
In July I finally got around to choosing a backing and basting the quilt. The backing is a dark blue with small bits of orange in a honeycomb type of pattern. Most of you know that I am a self-taught quilter, so some of my techniques are a bit peculiar, but they work for me, so I don't care about their peculiarity.  Since I am not good at free motion quilting, and this quilt required close quilting because of all the seems. I made a tissue paper pattern with my Baptist Fans quilting pattern. I pinned the pattern sections on the quilt and followed the pattern.  Naturally, things would shift a bit, and the pattern tore occasionally as I sewed, but it gave me enough guidance that I was able to sew a fairly regular baptist fan. Here is a picture of part of the pattern as it is laid out on the quilt.

I was only able to quilt about an hour a day because wrestling with this big, heavy quilt on a home sewing machine caused some shoulder and back strain. Little by little, I was able to get the quilting finished. While the quilting took me about an hour to do one row of fans, it took another hour to pick out the tissue paper.  Most people would not have enjoyed that part, but I was in no hurry, so picking out the paper pattern didn't bother me. I was enjoying my journey.
Once the quilting was finished, I made my quilt label, and I chose a solid black binding.  Using the Perfect Binding technique taught to me and the Coastal Haven ladies by Mary Lawrence of Magnolia Springs, Alabama, I was able to easily and smoothly attach the binding.  I put the final stitch in on November 1st!

Almost everyone who has seen this quilt has asked what I am going to do with it.  The answer is very simple. Since it was made in the 5th wheel, it will be used in the 5th wheel. I suspect I will take many afternoon naps under this quilt which will be on the couch in the 5th wheel's living room.
Another frequently asked question is:" What will you make now?" The answer is: Bonnie Hunter's Pineapple Crazy from her book String Fling.
Another often asked question is: "How many blocks are in this thing?"  The answer is: 504 blocks each with 17 logs which equals 8568 pieces!  Yep, that is a LOT.

Saturday, July 14, 2012

Finished Landscape Quilt Piecing

I finished piecing my Landscape Quilt a couple of days ago, but didn't get around to taking the pics until today.

 School House
 Egge General Store
I used the alphabet stitch on my Elna Pro Quilter's Dream sewing machine to write the name "Egge General Store" on the building. It's fun to be able to personalize the store sign with our family name.  When my husband looked at the store section of the quilt the other day, he thought I should put a sign in the window that says: "Cash only". (My maiden name is Cash.)  I'm still thinking about that and might applique a small sign in the front window of the store.
 Barn
I really like the way the Barn turned out.  I was a little skeptical about how the 2 red fabrics would look in the barn. Now that I'm finished, I'm quite happy with them.  They contrast enough to give the depth that is needed for the shape of the barn.
 Lower half of the quilt

And, finally, here is the whole quilt. I am so happy with the way it turned out.  I am not very good at selecting colors for quilts.  While this quilt used lots and lots of colors, (I think all of the colors of the spectrum ROYGBIV are represented) they still have to look good with one another as well as give the depth that is necessary.  Now that I am finished, there is very little that I would change.
This quilt will always be a favorite of mine because it reminds me of a Charles Wysocki painting. I have made quite a few needlepoint pictures of Charles Wysocki scenes. So, making this quilt seemed to be a natural fit for me.  It was very challenging to get the pieces to meet up correctly.  I occasionally had to do some ripping and restitching, but actually I didn't have to do as much of that as I thought I would. 
I have a couple of other project to complete, so I probably won't get around to the quilting of this until later in the fall. Those of you who follow my blog regularly will probably see this quilt again in the future.

If you'd like to keep up with my progress on this quilt, as well as see the other quilting items that I am making, become a follower of my blog, so you will always see my newest blog entries. To become a follower, just click "Join this site" in the right hand sidebar. Also, leave a comment so I know who has been looking at my blog.

Friday, June 29, 2012

Landscape Quilt Progress

I am making good progress on my Landscape Quilt.  Last night I finished the 9th panel.  There are 13 panels in the completed quilt, so I'm about 3/4 of the way finished with the piecing.  This is the most fun quilt that I have ever made.  I really enjoy watching the picture come together with each section that I make.
At the rate I am going, I should be finished in a week or two.


Saturday, June 9, 2012

Landscape Quilt

Last winter when we were in Alabama, I went with the Coastal Haven ladies to Mary Lawrence's Quilt shop in Magnolia Springs.  While we were there, the pattern for a landscape quilt caught my eye.  I debated and debated with myself about buying that pattern.  I already had too many projects in progress or on my to-do-list. However, I was afraid that if I didn't buy the pattern, I'd be mad at myself later, so I bought it.
The pattern in called "All Roads Lead to the Sea".  It comes from Country Creations.
I am not particularly good at choosing fabrics, but about a month ago, I was in the mood to start this quilt. I dug through my fabric stash and found plenty of green fabrics for the trees and browns for the pathways and roofs,as well as small pieces to use here and there in the buildings, and I had a nice piece of sky fabric left from Ethan's Noah's Ark quilt. I went online to my favorite online fabric shop, Connecting Threads, and was able to find fabrics that I thought would blend well for the fields, beaches, and water in the landscape.  The fabrics have arrived, and I have started piecing my quilt.
 There are 12 panels in this quilt, and I have completed 5 so far. I am really, really enjoying the making of each panel. Every panel is a challenge because the cutting and piecing must be soooooo precise so that everything lines up correctly. Consistent quarter inch seams are crucial!


I will update you on my progress as I go along.

Wednesday, May 9, 2012

New Baby's Truck Quilt

Our son and his wife are expecting their 3rd boy in July.  Therefore, I needed to make another boy quilt.  I thought it would be fun to make a quilt with lots of colorful trucks.  I had made a colorful train quilt for Jacob, and I really enjoyed making it.  I wanted to do something similar for the new boy. So, I looked for images online of truck quilts and actually found quite a few.  The one I liked the best is a Zebra Pattern which can be found here.
 I had plenty of leftover fabric from Jacob's Train quilt to make the trucks.  I also had a large piece of bright striped fabric, which was perfect for the border, left from Ethan's Noah's Ark quilt, so I only had to buy fabric for the backing. I am very pleased with the final result.  In fact, I am displaying this quilt at the Chester Public Library as part of their Mother's Day Quilt Show this week.
In the making of this quilt, I used my Clover Binder clips. They work GREAT!  It is so much easier to sew down the binding with the clips rather than using pins. They hold the binding in place at a perfect 1/4 inch.
Clover Wonder Clips are my new favorite quilting accessory.  They can be purchased at a number of places.  I bought a box of 50 from J Hittle Sewing.  J Hittle is a great place to buy quilting supplies in bulk quantities or individual items.

Thursday, March 29, 2012

Coastal Haven Quilt

Yesterday, I received a phone call from my good friend, Linda, at Coastal Haven RV Park.  She was passing on the information that the Coastal Haven ladies have decided to make a quilt together.  All of the sewing ladies are to make 2 quilt blocks and bring them to Coastal Haven next winter.  The blocks will be sewn together into a quilt top and quilted.  Then the quilt will be raffled or auctioned.  That is yet to be determined, I guess.

Since I'm still waiting for the pattern for the baby quilt to arrive, I had time yesterday afternoon to make my 2 blocks. I immediately knew that one of my blocks would be a simple Friendship Star.  So I sat down and drew up a pattern for a 10" block.  I looked through my stash of fabric and found a blue and a blue on gold that looked nice together.


After finishing the Friendship Star, I decided to try my hand at making a Flower Basket block.  I have never made one of those and had always wanted to try it, so this was a perfect time to make a Flower Basket.  I found 6 different red fabrics to use as the flowers, and I had a nice brown that made a great basket. The background fabric has a very pale pink pattern running through it.  The picture doesn't show that, so just take my word for it that there is a pattern in the background fabric.
There are a lot of free patterns for 10" blocks on the Internet.  Quilter's Cache is a great site to find just what you want.  There are patterns for beginners, intermediate, and skilled quilters. Click here and just scroll down the page on Quilter's Cache's website to the list of 10" blocks.

Saturday, March 24, 2012

Postage Stamp Blocks

I am waiting for a quilt pattern to arrive that I ordered a couple of days ago.  It is a truck quilt pattern for the baby quilt that I will make for my newest anticipated grandson.  I don't want to begin any other projects until I make the baby quilt, so today I took out my overflowing container of 1 1/2" squares and strips.  I sorted them into dark and light, and then started sewing them together into sets of two.

Whenever I finish making a quilt or other project, I cut my scrap pieces into usable sizes for other scrap quilts.  I use an adaptation of Bonnie Hunter's scrap users system. Many of the fabrics are gifts from my good friends who know that I use small pieces in many of my quilts.  I really enjoy making tiny blocks from pieces that most people throw away. Adding other people's scraps to my own gives me a much greater variety.  Some of you reading my blog may recognize some of your fabrics in these piles of squares and strips.

 I find it relaxing to mindlessly chain piece these little "twosies". It really doesn't take long to get a rather substantial pile behind my sewing machine.

 The photo to the right shows you how small the little squares are compared to a quarter.  That little scrap of fabric comes from Rosanne at Coastal Haven.  Last spring she sent a bag full of scraps to me via Linda Saunders. I have had fun using her scraps. They have found their way into mug rugs, place mats, my log cabin quilt, and now my postage stamp blocks.

Here is one of the finished 4 patches.  When I get a few hundred of these, I'll start sewing them together. I like to wait until there is a lot of variety before putting them together.
I have no idea how long it will take me to make a quilt of these little blocks, but I am in no particular hurry.  So, if it takes me several years, that's just fine.

Wednesday, March 21, 2012

Ipad slip case


 When the new Ipad came out, I decided to get one of the old Ipad2's at a reduced price.  I've been having fun learning to use it.  Naturally, it needed a padded case, so that it will be protected when I take it along on trips. 
I spent quite a bit of time searching the internet for a free pattern.  There are a lot of patterns out there.  I decided that I liked this one the best. It is a free pattern by Pat Bravo found here.
Instead of using 3 different fabrics as in the directions, I decided to use just 2. I am very pleased with how nice the case turned out. 
Now my Ipad has a nice cozy padded case to protect it on our travels.

Thursday, March 1, 2012

Earth, Wind, and Water

My latest project is the Earth, Wind, and Water table runner.  I have had this pattern for a couple of years.  It was featured online at Quiltmaker.com.  This table runner uses the off-center pineapple block from the Great Balls of Fire quilt which appeared in Quiltmaker Sept/Oct '09. I used Dark Blue, Burgandy, Medium blue, light blue, and a white background in my version.

Friday, February 17, 2012

Log Cabin Quilt

Today I put the final border on my Log Cabin Quilt.  I've been working on it for about 3 years when we are in our 5th Wheel.  This has been my take-along project.  The blocks are tiny 3" squares with 17 pieces in each block.  There are 502 of these blocks! When I do the math on this, it adds up to 8534 pieces. 

I really enjoy looking at the fabrics because they remind me of the many friends who have given me little pieces of fabric to put into it. Only the inside border was made from yardage.  Everything else was made from pieces that were intended to be thrown away.  This photo below gives a good perspective of how small the pieces are in comparison to the quarter.